
Decorate a Wooden Heart: Gift Tissue Paper and Faux Floral DIY Tutorial

With this budget-friendly DIY tutorial, learn how to create a beautiful decorative wooden heart using gift tissue paper and faux floral pieces. All the materials for this project can be easily found at Dollar Tree. Get creative and make a personalized gift or home decor piece. This tutorial will show you how to decorate a wooden heart using gift tissue paper and faux floral to create a beautiful, personalized gift without breaking the bank.

Wooden hanging heart paint pink with heart pattern and faux floral and gold letters

Decorate a Wooden Heart Video Tutorial

Materials such as, faux flowers, scissors, paint, tissue paper, and gold letters

Materials
Dollar Tree purchases
One wooden heart 
Gift tissue paper
Faux floral

Items needed
Hot glue/Adhesive
Scissors
Mod Podge
Paintbrush
Optional-Parchment paper

Items I already had on hand
Gold letters (this is optional)
Mini iron (this is used for applying the gift tissue paper and Mod Podge)


Tissue paper and Mod PodgeMod Podge and tissue paper over wooden heart

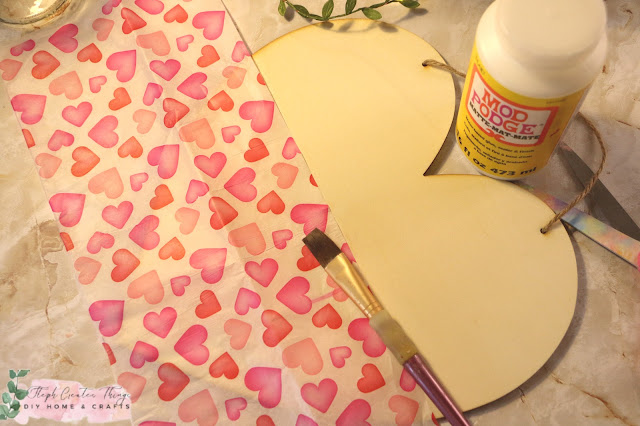
Begin by cutting a section of tissue paper that you will add to the wooden heart. You can choose to add the paper to only half of the heart or cover the entire surface. 

Next, apply Mod Podge to the section of the heart where you will add the tissue paper. Place the tissue paper over the Mod Podge and cover it with a sheet of parchment paper. Use a mini iron to iron over the paper, which will help reduce the appearance of creases and lines. 

Using a sanding block
Sanding block near wooden heart with heart tissue paper pattern

To achieve a blended look, you can use a sanding block on the wooden heart. 

Applying acrylic paintWooden heart pattern near acrylic paint and paintbrush

Apply acrylic paint to the unpainted section of the heart. You can use one or more colors and blend them.

Adding the letters
Pink painted wooden heart with heart pattern tissue paper and gold letters

 If you want, you can add letters to the heart. For example, you could add "love" just above the design. 

Adding the faux floral
Faux white flowers, floral cutters and painted wooden heart

Finally, use floral cutters to cut your flowers and add them to the wooden heart using adhesive. You can add them around one side of the heart or all the way around it.
Completed wooden heart sign with faux flowers, heart pattern and gold letters

You have finished decorating the wooden heart. This craft is perfect for those looking for budget-friendly home decor, and it serves as an excellent addition to any Valentine's Day decoration.

You may also enjoy

Pin Share Save

Pinterest pin showing hanging heart decoration with faux floral, gold letters, and heart pattern


Comments

  1. This is so pretty! I love your choice of patterned paper and the artificial flowers finish it off nicely.
    Thanks so much for sharing with #MMBC.

    ReplyDelete
    Replies
    1. Jayne, thank you. It was a fun project to work on.

      Delete
  2. Oh, this is so cute! What a sweet design. Visiting from Crazy Little Lovebirds linkup.

    ReplyDelete
  3. This is such a simple craft but it's so pretty. What a lovely design. x

    ReplyDelete
  4. A great tutorial and the end result is so pretty! Thank you for sharing it.

    ReplyDelete
    Replies
    1. Thank you so much. I'm happy to hear you enjoyed this craft.

      Delete
  5. The decorated heart is very pretty. I love the tissue combination. #MMBC

    ReplyDelete
    Replies
    1. Carol, thank you. 😊 I appreciate you visiting.

      Delete
  6. Steph, this is so pretty! I appreciate you sharing the video too.
    Thanks bunches for sharing this tutorial with Sweet Tea & Friends this month sweet friend.

    ReplyDelete
  7. Another brilliant creation. I always love seeing what you come up with. Featuring when my link party opens.

    ReplyDelete
    Replies
    1. Carol, thank you so much for visiting my blog and for the feature!

      Delete
  8. Thank you for sharing this adorable craft with us at Farmhouse Friday 333. I'll be featuring it tomorrow. Hope you link up again soon. I love your crafts! pinned

    ReplyDelete
    Replies
    1. Cindy, aw thank you so much. I love sharing at your party.

      Delete

Post a Comment

I love hearing from you! Your comments and creative ideas truly brighten my day. I do my best to respond to everyone, so if you have a question or just want to say hello, please leave a note below. To keep our community a positive and inspiring space, spam or off-topic comments will be removed. Happy crafting!

Popular posts from this blog

A Touch of Spring: Faux Rose & Wildflower Beaded Wreath Tutorial

Today I’m sharing a soft and delicate spring wreath that comes together beautifully with just a few simple supplies. I’m using a beaded wood wreath as my base, along with faux yellow roses, pink artificial wildflowers, and a bit of foliage to bring everything to life. This project is perfect if you’re looking to add a gentle pop of color and a touch of spring charm to your home. Video tutorial  Supplies You’ll Need Beaded wood wreath Faux yellow roses Pink artificial wildflowers Faux foliage Floral/wire cutters Craft wire Trim Your Florals I started by using my floral cutters to trim the stems of each flower. Make sure the stems are short enough to fit nicely against the wreath, but long enough to secure them with wire. Adjust the length to suit your design and the level of fullness you want in your wreath. I began by cutting my yellow roses first. Prepare Your Craft Wire and  Attach the Roses After I trimmed the roses, I cut small sections of craft wire. These will be u...

Summer Craft: DIY Paper Plate Watermelon Flower Hanger

Hey everyone! I'm excited to show you a fun and easy craft. Today, we will be making a summer watermelon floral hanging design using a paper plate. This DIY project is easy to create and fun to welcome the summer season. You'll make this watermelon floral hanging design to display your artificial flowers creatively. It's also a great way to use any extra paper plates you may have lying around and aren't sure what to do with. You may have extras from a birthday party or a BBQ. If you're ready, let's get started creating your floral hanging design! Video tutorial Summer Craft: DIY Paper Plate Watermelon Flower Hanger Materials: - Paintbrush - Artificial flowers - Paper plate (any size you prefer) - String or craft twine - Scissors - Hot glue Optional-Hole Puncher Start by cutting the paper plate in half. Use a darker green paint to cover the bottom area of the plate. Let it dry between each coat of paint. Continue applying paint to each area of the plate. Then, ad...

Easy Steps to Create a Cozy Autumn Tablescape at Home

Hello everyone! I’m excited that you decided to visit the blog today. I wanted to share how to create a cozy autumn tablescape at home. My goal was to design something warm and inviting, as our table is a space where we share conversations, drink coffee, tackle homework, and simply enjoy each other’s company.  I typically don’t go all out when decorating my dining table, but I wanted to show you how I styled it using decor pieces I already had. I would love for you to join me in this decorating adventure! Video tutorial Create a Cozy Autumn Tablescape at Home Items I'm adding to my table:  -White tablecloth runner - Battery-operated leaf lights  - Reusing glass jars  - Mini pumpkins and other fall decorations  - Small "Hello Fall" sign  - Faux flowers I began by spreading my white tablecloth down the center of the table. Around Halloween, I purchased this tablecloth a few years ago at my local Walmart. After laying it out, I realized that I could achieve th...

DIY Simple Decorative Serving Tray

Today we're creating a simple decorative serving tray. While shopping at Hobby Lobby they were having a Spring sale, and I was super excited to see all the markdowns. I decided I would create a simple decorative serving tray. So if you're ready I will take you through the steps of creating your very own tray. Video tutorial Materials  One round wood tray/sign 16  in x 0.98 in (41cm x 2.5cm)- I purchased my sign at Hobby Lobby during their Spring sale Paint- I am using Artminds multi-surface on my stencil design And Folkart Home decor chalk paint for the tray. Color is milk jug in ultra matte Mod podge A set of round sponge brushes One paint brush Two decorative handles  Four screws -for handles One Screwdriver Floral stencil Optional- Drill, and a drill bit for drilling pilot holes into the tray for handles Begin by applying your chalk paint onto your tray. When applying my paint onto my tray, I painted around two to three coats of paint. In between coats, you can use eit...

Easy Dollar Tree Easter Tabletop Decoration

Transform your Easter table into a whimsical wonderland with a delightful metal bunny plaque from Dollar Tree - it's an easy and affordable DIY project! Today we are creating an Easter tabletop decoration using one of the galvanized bunnies from Dollar Tree. I actually purchased it last year, but I hadn't gotten around to creating a craft with it until now. This craft is beginner-friendly and only uses a few materials.  Video tutorial Materials One galvanized bunny sign One rectangular wooden piece  can easily use scrap wood. I am using a wooden piece from a block set. I purchased one round wood piece at Dollar Tree; they come in different shapes. I decided to go with the oval shape. Acrylic paint- I am using a color called celery for the wood pieces and applying white to the bunny sign. Twine Faux greenery and tulips Mod Podge Paintbrush Hot glue Decorative napkin Floral cutters Begin by taking your paintbrush and applying paint over your galvanized bunny. This is not requir...

Search This Blog

All content Copyright

Copyright 2021-2025 I ask that you do not take or use my photos or words without permission. If you have any questions, please feel free and contact me. Also, for more information on this blog, check out the disclosure policy tab above. Thank you